Showing posts with label Sewing. Show all posts

Thursday, March 7, 2013

One more for the bucket list: Cosplay!

Hello again!

I once more have something crafty to share with y'all, and I'm actually super proud of it. This is my first cosplay! I have always wanted to do it, and now I can finally say that I have!

Now cosplay is essentially dressing up as a character or even things from books, TV shows, movies, etc. It's pretty popular at anime and other types of conventions. However, when my friends and I decided to cosplay, we did it for school.

Sort of. You may be surprised to learn that medical school isn't always "study study study". We have time for fun things, like our belated Lunar New Year Festival that just happened last Saturday. It consists of acts performed by medical students, undergrad students, and some of the other schools on our campus (PT, OT, audiology, etc) putting together acts to perform for fellow students, faculty, and really anyone else we care to invite.

One of these acts that I participated in was a dance inspired by Avatar: the Last Airbender and The Legend of Korra (I talked about them in the post about my favorite TV shows). Any fans here?

Quick introduction for those who are not familiar with the Avatar universe: in this world, some people are born with the ability to manipulate ("bend") one of the four elements: air, water, earth, and fire. The Avatar is the lone person in the world who can bend all four. Bending is commonly used in combat, so in the TV show, the animation of each type of bending is based off of a martial art.

In this dance, we correlated each of the elements with a dance style. Water was more lyrical, earthbending was step, fire was hip-hop-ish, and air was breakdancing. Two of my friends (and fellow Avatar fans) who were in the dance with me decided, "What the hey, we're gonna cosplay this!" Water, fire, and earth all have one major female character associated with them, so we went as Katara, Azula, and Toph, plus an Aang!

BUT! I'm the only one of us three (four, if you included our airbender, who we roped into cosplaying with us) who can sew. I have made from scratch a grand total of three real garments for myself: this shirt and two pairs of PJ pants. This was my first time using darts, an invisible zipper, interfacing, and inset sleeves.

But hey! Two weeks, four costumes, almost no experience? On top of rehearsals for three different acts for the Lunar New Year Festival and schoolwork? Totally doable!

That sounds sarcastic. And you know what? It was hard...but I did it! And we looked fantastic!


Sadly, our airbender had to leave the performance early, so no group picture with him. :(

Some of my preliminary doodles (with the measurements blanked out, for obvious reasons):


See more photos of the costumes after the cut!

Friday, November 16, 2012

Commitment Day 16: Basketweave


This is Day 16 of my 30 Days of Commitment series. Check out the other posts in this series, too!

Gosh, I'm sorry, guys. This has been another hectic week for me, and I ended up letting this series slide yet again! But then again, this is sort of what the purpose of this whole series was right?

Well, I just go on thinking like that so I don't feel as guilty. ^_~

What I'm sharing with you today is a pretty old project that I never got around to posting. This bag:


A long time ago, I was flipping through a crocheting magazine and was intrigued by a photo of a cross-body purse made using the basketweave stitch. I found this stitch in my book of many crochet stitches, but it's easy to find. A quick Google search brought me to this tutorial, which looks pretty much like what I did.


This was a pretty easy bag to make. I crocheted two panels of basketweave for the front and back, then crocheted one long strip of single crochet to make the strap. I simply single crocheted along the edges to connect them.


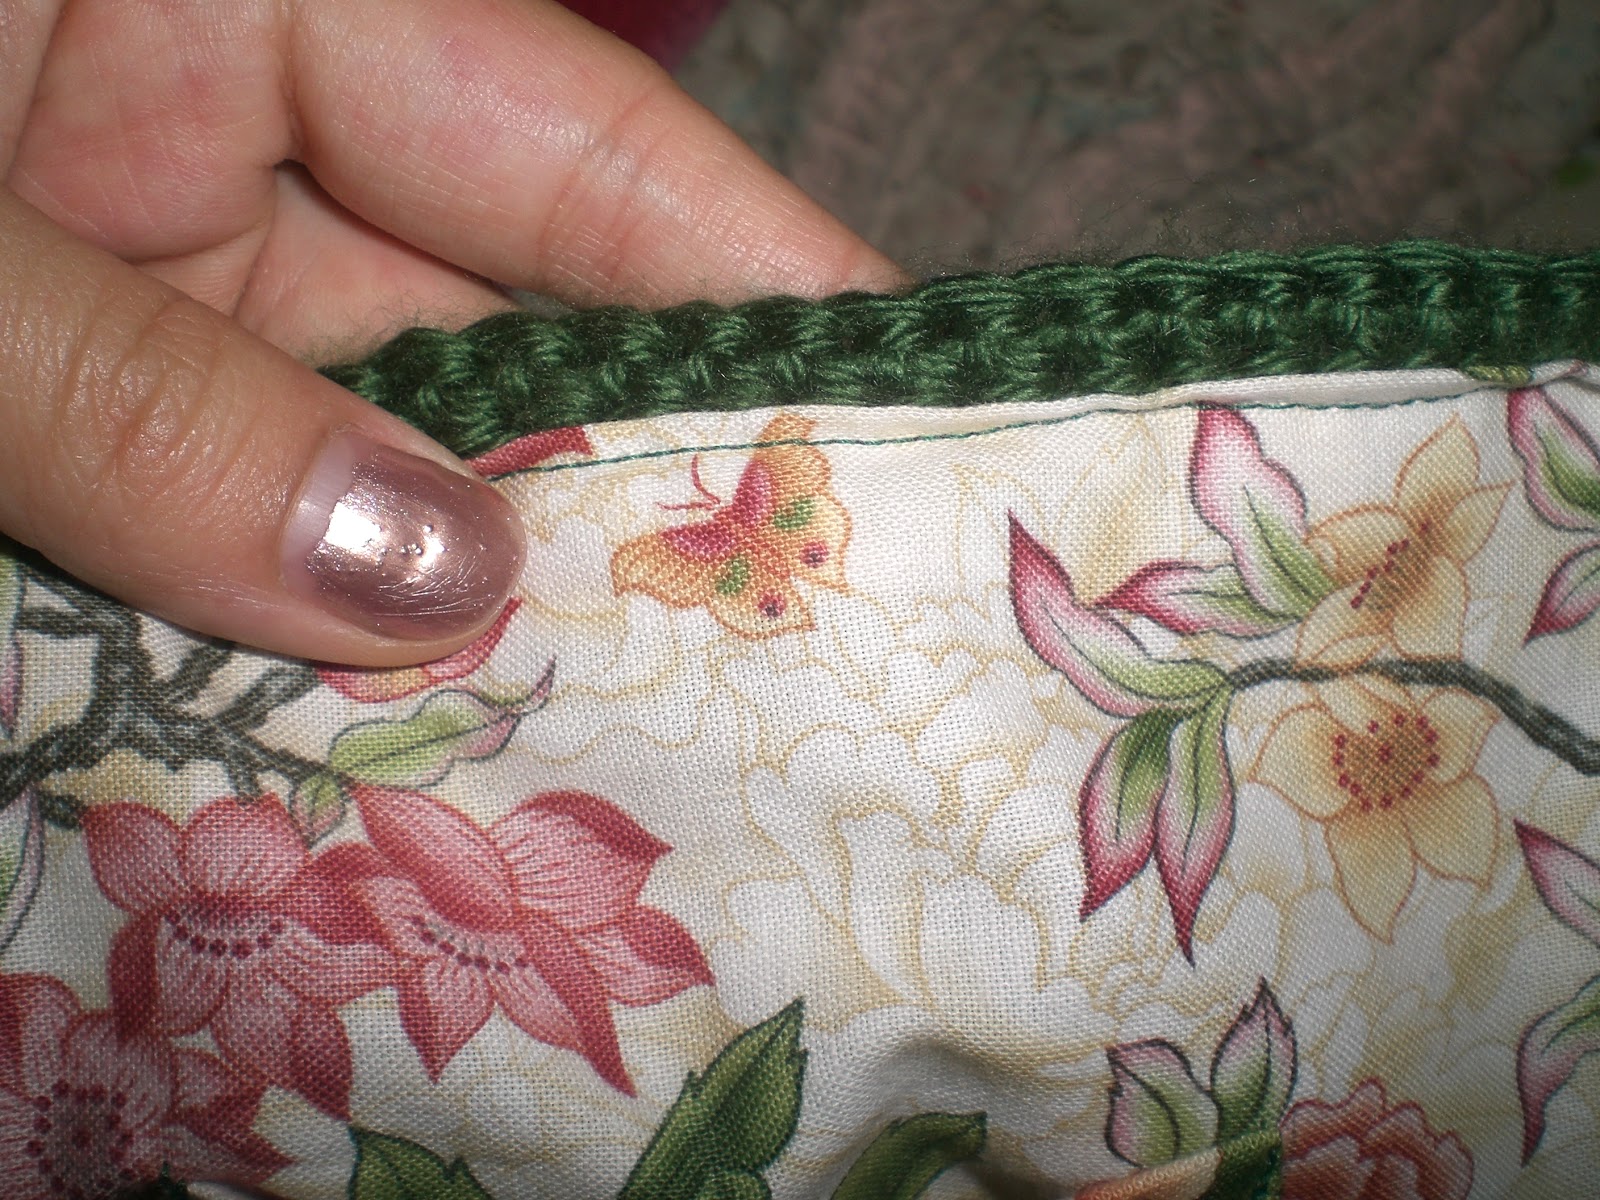
A little too late, I discovered an interesting flaw in this design: a crocheted strap will streeeeetch. And mine was already bordering on too long. So after some pondering, I happened upon this solution. Use ribbon!


Basically, I found some ribbon in a coordinating color to stabilize it. The ribbon I found wasn't nearly wide enough, so that line you see going down the middle is where I zigzag-stitched two ribbons together. Once this was done, I simply lined up this ribbon strip along the crocheted strap and sewed down each edge. Voila, problem solved!

I chose this gorgeous fabric for the lining. The method for making it was similar: cut out two large rectangles for the front and back and then a long, continuous strip for the sides and bottom.


I did, however, add a couple things to the lining. I added three pockets, two cell phone sized and one larger.


I also added a key fob, because I hate having to fish through a big bag for my keys.


There's also a closure strap that can button at two different buttons, depending on how full the bag is.


And to attach alllll of this to the crocheted portion, I slid in the lining, sandwiched the button strap and the key fob between the two layers, and sewed it all together.

Instead of doing the usual thing with lined bags where you flip everything inside out, etc, etc, I simply folded down the edges of the lining and basically topstitched around the edge. Worked out pretty well. :)


So what do you think? I'm pretty proud of this bag. It makes a nice, casual alternative to those days when I'm just not feeling the backpack (my laptop fits in there nicely). 


I hope you enjoyed this post, and I hope you found it inspiring! I enjoy those times when I see something and am able to recreate it myself without relying on patterns. :)

-Annie

Shared at:


Thursday, November 1, 2012

Commitment Day 1: Something Old


Welcome to Day 1 of my 30 Days of Commitment! Find the other 30 Days of Commitment posts here.

As I've said before, this is a personal challenge to see if I can post something every day of November. The rules I've set for myself are:

  1. Each Day must be posted between 12 am and 11:59 pm of that day.
  2. I am allowed to schedule posts ahead of time.
  3. As much as possible, I should not post similar material on consecutive days (eg. if today I post about a crocheting WIP, tomorrow's post should not be, at the very least, yet another crocheting WIP; I should at least switch to a sewing or other crafting WIP)
I hope I'm able to adhere to these rules! I'm already falling behind schedule: I had intended to have a few posts already set up, ready to be posted at a scheduled time. Looks like I flubbed that one!

Today's post is sort of a throwback. Do you remember this vest I made from an old T-shirt?

Pardon the glow. That's what happens when you stand
your camera on a white surface, apparently.

I really did like it at the outset. I have a pretty big wardrobe, but even now, nearly two years after this vest was made, I still don't have many vests. I'm pretty picky about what I do and do not like, and it soon became evident that there was something about this vest that just wasn't cutting it for me. And remember this post about making your clothes work for you? Time to make some changes!

What I've realized is that I tend to like structure. Pretty and flowy is nice, but only to some extent. For example, I always need to wear this vest belted. I can't stand having it loose, because I don't like losing that waist definition. I'm still trying to resist the urge to buy a vest like this, or this, or this, or especially this.

You guys, Flynn Rider's vest. Every time I watch that movie, I want to steal it. I haven't had this much clothing envy of movie character since The Devil Wears Prada.

Back to the point: I like structure! So besides this problem, I also found that the sleeve holes were a bit too wide for my taste, and the whole deal in front was just draping in funky ways, and I wasn't liking having to figure out how to adjust it over my chest.

So I finally hit upon a very simple solution:

From blah, loose, no shape, nothing interesting...

...to yay! Interesting and better shaped for my body.

Voila! Converting into a racerback solved my "huge armholes" problem and my problem with having too much business going on in front by pulling a lot of the fabric to the back. It also created something much more fun (and a little more structured) to look at, now that whatever I'm wearing underneath shows through. There's a short, "did it in Paint" tutorial of what I did after the cut. It's pretty simple stuff.

Before we go there, I'd like to ask you guys something:

I've taken a much greater interest in fashion over that past year or two. My wardrobe has expanded quite a bit, and I've amassed a huge collection of scarves (which you guys will see later this month!). 

There are a lot of "X ways to fold your scarves" tutorials out there, some with awesome novel ways, and others that are...less novel. However, I have never seen this particular method, which I learned from a saleswoman in China.


Would you guys be interested in a tutorial on this? Would you like a photo tutorial? A video tutorial? Both? Please let me know!

All right, back on topic, the tutorial for the racerback vest...

Wednesday, January 4, 2012

The New Year begins!

Hello everyone! As always, it's been a long time since I've posted, and yet again this will be more or less a quick in and out to update you guys and say hi. I hope everyone had a wonderful holiday!

My first order of business is to give you guys a huge thank you! The video I posted on the stitch used in my Forever 21 scarf has over 7000 views, and I have more than 70 people subscribed to my channel after just 1 video! I know that's small potatoes in the YouTube world, but it makes me feel warm inside that people are interested by what I do. Stay tuned, YouTube viewers, as another video is (eventually) forthcoming, although this one is oriented toward fashion rather than crafting. I hope you all will like it!

Also, I wanted to submit some proof to you all that I have actually been crafting during my long silences. So here are a couple of the things that have been occupying my time.


Pictured above, a shirtdress I picked up at the thrift store. It was much longer before and made me look absolutely ridiculous, so I had to hack off several inches, and now it's stylin'! Action shots will come in the future.


At the top is my new tote bag, made using this tutorial. The gray is a suede fabric, and the print is blue and gray with black characters, cranes, and other very Oriental-looking designs.

Below it is a black infinity scarf made using a lacy pattern from the book The Harmony Guide to Crochet Stitches, called the Open Crescent stitch. It's a great book I picked up for just a few bucks from a resale shop. I used Caron Simply Soft Black yarn and a G hook.

The gray is a scarf I made for my boyfriend using the free Lion Brand Thermal Scarf pattern. It's super stretchy and warm, and I might end up making my own in a more colorful yarn. I used Caron Simply Soft Heather Gray and a J hook.

The two turtles I have there are the first of 7 turtles made as presents for some of the friends I've made here at med school. Clearly not as much crocheting got done over break as there should have been. >_>

The black hat is a (possibly) work in progress. I wanted to imitate the hat I wore in the photo below, but I can't figure out knit cables to save my life.


I used another pattern from the crochet stitches book to try to imitate cables, but it doesn't involve post stitches, but puff stitches instead. I say possibly a work in progress because my original intention was to add a brim, but I'm not sure if it's necessary. Also, the ribbing (which was added on using this tutorial) is just a tad tight, enough so that every time I put it on I need to fuss with my hair in order for it to look right. Still, I'd say it's already a pretty rocking success.


It was also made with Caron Simply Soft Black yarn and an H hook.


This white hat was made using the famous Pretty Puffs slouchy hat pattern. I learned a lot from this hat. I was not using the same weight of yarn as she did or the same hook size, so I couldn't be sure that following her pattern exactly would get me the results I wanted. I was using DK weight yarn (sorry, don't remember the brand) and (I believe) a J hook. I ended up only needing to add an extra row of increases to get the hat to fit right, but it took me three tries and lots and lots of frogging to figure that out.

So that's what I've been up to! For 2012, I have so many projects I want to tackle, and I'm really really excited for the new year! Did you guys make any New Year's resolutions? Do you also have a massive list of crafty things to accomplish?

Thanks for sticking around! I will see you next time!

-Annie

Friday, March 25, 2011

Make it something you LOVE

Hello again! You probably won't be hearing from me in the next couple of weeks. I have massive amounts of studying to do, as well as a Capstone paper to write. >.< If I don't come back, it means I've died of exhaustion. Ack!

So what I'm showing today is really simple, but when I realized this, it was still eye-opening. You know those clothes you have that are just...okay? The ones where you look at them and think, "If only this or that were different, it would be perfect."

I've finally realized that I have the ability to make them perfect! Well, for me, at least. ;) And so do you! Take, for example, this sweater.


It's a nice sweater. I wasn't a huge fan when I first got it because I wasn't so open to the chunky knits thing. But lately, I've really come to see the great potential in it. (It also comes with a matching belt, so I don't look like a droopy rectangle when I wear it!)

However, there was one thing that really, really got on my nerves about this sweater. Can you guess what it is? Here, I'll give you a hint.


ARGH! Those buttons! Do you see how they're this funky, pinkish hue? I probably wouldn't have minded if they were actually pink. But these buttons just look faded and grody and I hated looking down at them when I wore this sweater. (bonus points to anyone who realized the buttons aren't sewn on...I had already replaced them so I just put them on top of the buttonholes)

So for months I pouted and mentally whined about how much I hated those buttons until I came upon a revelation: Change the darn buttons already!

My first thought was to go through my modest button stash. I experimented with variations on a hue (red, green, or blue), or using multiple colors. Ultimately, I decided that I still wanted my buttons to be plain and simple, because the cabling was already quite enough detail. So I went to Hancock Fabrics, found some lovely, simple black buttons, and here we are!


So much better, yes? I like how the contrast makes the sweater a leetle more interesting without making it look busy. Here's how I wore it with the the shirt I just posted about.


I look a bit bulky...I'll just blame my boyfriend for taking pictures of me from a low angle. :P And yes, I switched out the belt. I wanted something with a bit more color.

I now love this sweater. Let's look at the comparison again:


It was such a small change, but it made a world of difference to me.

Your assignment: Evaluate your own wardrobes and see if there's something in there that just needs a little tweaking. A shirt that needs taking in? New buttons on your cardigan? A dress that needs to be shortened or lengthened? Take the time to do these things, and you will thank yourself immediately afterward! It's totally worth it to be able to turn something you like into something you love.

What item in your closet do you think needs a little switching up?

See you all next time!

-Annie

Shared at:

Flamingo Toes Think Pink Sundays (sorry Bev, the button wasn't working for me!)


NightOwlCrafting


Sunday, March 20, 2011

From scratch!

Long time no see, my friends! Things have been absolutely nuts in my life this past month, and the crafting front is quite quiet. However, I have many, many old things I would like to show you, so I will slowly be posting about those in the coming days/weeks. Is it sad that I had to wait until Spring Break before I had time to draw a breath and maintain my blog? Wow.

Anyways, this project had me super-excited. My interest in sewing was initially inspired by my interest in recons. However, despite my lack of experience, I have always had the ambition to sew something from scratch (hence the heaps of fabric in my closet). Hallelujah, what should I stumble upon one day but this fabulously simple tutorial for a fabulously simple shirt? And would believe that this girl is only in seventh grade??? Such envy...

Ready to see my VERY FIRST WEARABLE ITEM MADE FROM SCRATCH? (can you tell I'm excited about this? Haha...)

Voila!


Oh yeah, look at that, look who's a crafting boss! By the way, please forgive the exposed closet, my ancient apartment doesn't have closet doors. I'm debating getting a pretty shower curtain to cover it and use as my photography backdrop, but we'll see.


These photos without flash are a bit more true to color. I have no idea where the fabric actually came from, but I've had it for years, and I have a lot of it. My grandmother used it to make a baby-sized bathrobe for my brother, and he's 11 now, so let's let the age of this fabric really soak in...

I won't be posting my own tutorial since I don't want to be stealing Nay Nay's glory. But I did modify it in a couple ways.


Number one (and honestly my favorite part of this shirt), I hemmed the neckline rather than using a band. However, for some reason I decided to be a genius and use a straight stitch with jersey. I don't know if any of you have tried it, but you can feel how weak that kind of seam is. So to add some strength, I went over it three more times, this time making the lines wavy for visual interest. And I really love the look! My only real regret is that I wish I had cut an even more generous neckline, but there's still plenty of jersey in my stash! :D


I did something similar with the sleeves, opting out of using a cuff and instead hemming them. I'm not as happy with them because it is much harder to manipulate the waves when the sleeve is so stretched around the machine, so they don't look quite as nice. I'm pretty sure I'd be the only person to notice though, haha.


So there you have it! Make sure to visit Nay Nay's blog, Sweet LemoNAYde, if you're interested in this tutorial or any other simple but awesome sewing projects. Seriously, how many seventh grade girls are this cool?

-Annie

Shared at:


NightOwlCrafting