Showing posts with label Tutorial Links. Show all posts

Tuesday, June 4, 2013

Tape and Smartphones

Hi all!

Test day will be upon me very very soon. At this stage it's reached the point where I really just want it to be over and done with. Soon!

Just a quick post to show off what I do with some of my breaks. 

I assume by now that most of you are familiar with washi tape. I thought it was cute, but kind of silly to blow money on...but really, this stuff is super fun. :D

First, in the course of studying, I wanted bookmarks. It just so happened that I had rediscovered How About Orange (super-fun blog, highly recommended!) and found this tutorial for a heart-shaped corner bookmark.

Whipped up two super-quick with some notebook paper I had on hand. Unpleasant surprise: they didn't stay flat and folded as well as I had hoped. And of course they weren't exactly pretty. But with a little tape to hold things together...


Cute! Far from perfect, you can even see the notebook paper lines on the chevron one, although I do think it's cool that the lines almost matched the peaks. :)

It just so happens that I had recently found this tutorial for a washi tape-covered box, and even had one of those white necklace boxes just laying around. So when I had a mini-meltdown around lunch, I did this to cool myself off:


Prettified!

The rest of my possessions had better watch out, they're about to get WASHI'ED, muahaha!

Final note before I toddle back to my flashcards: did everyone else already know that there's a Blogger smartphone app? All you have to do is search Blogger in your app store and it comes up!

To tell the truth, I could immediately tell that there would be some problems with it. You don't have a lot of freedom in formatting on the phone, and I find typing on my phone downright annoying sometimes. But the reason why I got the app was that now, I can take pictures on my cell phone and immediately upload them and save as a draft! No more excuses! No more waiting until I've charged my camera or found the energy to connect my phone to the computer and upload photos!

Maybe this will up my posting frequency, who knows? I love technology, guys. :)

Welp, that's it for now! Until after Step 1, my friends!

-Annie

Monday, May 20, 2013

Magic

Hi all!

Brief update on life: I'm currently immersed in cramming for USMLE Step 1, which any American medical student will tell you is one of the most (if not THE most) important standardized exams of my life.

Not only does it test pretty much ALL the knowledge I theoretically gathered over two years of medical school, but the score on this exam matters a ton for where I eventually do my residency (essentially my paid training years). For those of you who are unfamiliar with the system, I will literally be taking exams for the rest of my life, and they will arguably be harder than this one. But the kicker is that for those later exams, I only have to pass. I don't have to worry about elbowing my way through the percentiles amongst thousands of extremely intelligent peers for a score that could determine the future of my career.

So. A little stressed. I hope you all forgive me for the long hiatuses. Also, soon after, I will be beginning third year. Which is...sort of like an apprenticeship, is the best way it can be described. I'll be busy and tired, but I will have free time (I just don't really get to choose when that free time is...). Hopefully I'll be able to bang out a little more crafting time next year. We'll see. If all goes well, you might even get a short post about  my mom's Mother's Day gift within the next couple weeks!

And now for the title. In the years that this blog has existed, I have always regretted that I couldn't directly reply to comments, especially when publicity on my infinity scarf took off and people kept coming back with questions. I tried to the edit the post itself to answer their questions, but many of those people never got direct answers because I couldn't figure out how to enable the "Reply" function.

It shames me as a member of the generation that grew up alongside Google that it took me this long to simply look up how to do it. And I found it. It was so easy. Straight from Blogger Help itself, this is how you enable the Reply  function in your comments section. Freaking magic.

I hope that helps someone else as much as it helped me. And now, back to studying.

-Annie

Tuesday, April 30, 2013

Statement Necklaces

Happy almost-May! I hope you all are well!

I've wanted to foray into jewelry-making before (anyone remember these?), but I was a bit limited by lack of tools and lack of inspiration.

Crafting confessions: I almost never wore either of these pieces. There are some times when you make something and you're just super-proud, but then a few days later you look again and realize it's...not that great. We've all been there.

But I'm actually reasonably certain that the necklaces I made this time will continue to be used! Score one victory for me!

The first I made was based on this tutorial. Absolutely gorgeous. I'd previously gone to Michael's and arbitrarily bought a couple strings of beads, being too silly to try and figure out how many I actually needed. Turns out, I had only purchased about half of what was necessary. But no matter, let's just shrink it down!

Shock and amazement, it actually turned out super pretty. (apologies for sad quality photos)


This used 28 beads instead of the 55 called for in the tutorial.

I was a little intimidated by having to use eye pins and head pins for the first time, but it was surprisingly easy. I need to get a second pair of pliers though. Pinching on to those jump rings kills the fingers!

The second necklace began as one of these super cheap "pearl" necklaces I'd bought for a buck each:


Using this tutorial as a guide, I started adding on a bunch of individual and doubled up beads (one head pin even has 3 beads on it...still deciding if I like it or not). Et voila!


So I'm pretty happy!

And then inspiration struck! Who ever said that even statement necklaces need to be worn alone?


I actually really like this combination, and I fully intend to wear these necklaces together someday! What do you guys think? Is this something you would try?

If any readers have been teetering on the fence about experimenting with jewelry-making, I totally recommend it. It's a lot easier than I was afraid it would be. Just make sure you have the right tools. :)

I'd love to hear any thoughts, opinions, and advice! Please share!

Thanks for reading!

-Annie

Tuesday, January 15, 2013

A Braided Scarf with Extra Glitz

Hi guys! I hope you all had a fantastic holiday season! I had a fun break, and I'm doing my best to stay on track with schoolwork and working out this year. To those of you who make New Year's resolutions, or who (like me) are constantly trying to turn over a new leaf and change for the better, I read this interesting article about how to stick to your goals. I don't know how well it works, but it's certainly worth a try!

So for this block of classes, one of my goals was to maintain attendance at my lectures. They aren't required, but my theory is that if I go to them instead of watching the video recordings afterward, I might manage my studying a bit better. Going along with that, I have also been trying to dress nicely for my classes. Some days I really only have time for the T-shirt, sweater, and jeans routine, but most days I have more time for a more "special" outfit, and it's part of today's outfit that I wanted to share with you.

This braided scarf concept has been circulating around the internet for quite a while. I really love wearing it this way and have shown it to a lot of my friends. I won't bother with a tutorial since the link already explains it perfectly well, but I just wanted to share a some inspiration for jazzing it up a little.

So today, I was planning on tying a brown silk scarf in a braid, but it lacked something. I realized that I was wearing these gold hoop earrings (they are not in the photos, as by the end of the day my allergies had started acting up and necessitated removing them), and I really needed a little more sparkle for a cohesive look.

And what did I reach for? A simple gold necklace. A little weaving and ta-dah!


(One of these days, my room will be clean and I will not be ashamed to have a wider frame in my photos. >_>)


It came out looking pretty darn cool, and it was very easy to do.


I simply unclasped the necklace and fed most of the chain through a loop at the very bottom of the braid. Leaving a very short portion dangling, I wove the chain through the braid, looped it behind the braid at the top, and wove it back down again along a different strand. Then all I had to do was refasten the chain at the back of the bottom of the brain and pow! Instant glitz!


So for those of you who find that the fancy scarf braid isn't fancy enough, give this a shot! Use a pretty chain, or maybe a string of beads or pearls. And of course, try this with other scarf-tying methods, too! It could really turn your scarf into something extra-special.


This braid and a mock men's tie (as shown above) are probably the ways I most commonly wear "fashion" scarves as opposed to scarves worn for warmth.

How do you guys like to wear your scarves? Would you try what I did with my braided scarf?

Thanks for reading!

-Annie

Tuesday, December 4, 2012

Coming out of my shell...

Guess what I've been up to since my last post?


TURTLES!!!


I posted way back when about all the turtles I had made previously using the Tiny Striped Turtle pattern.


Since then, you may vaguely recall a post last from earlier this year with this picture:


Those were the first two turtles I made out of this "collection". The intent was originally for them to be last year's Christmas presents to some of my friends here at med school.

Clearly that didn't quite work out.

"We're blind!" D:

This was their status before I started working on them today. All complete, but eyeless.


A couple episodes of Avatar: The Last Airbender and 14 black seed beads (as seen above) later and...


They are complete!

Note how so many of them are drastically different sizes. Apparently my gauge and stuffing technique can vary by a lot.

These turtles were all made using Caron Simply Soft yarn and an H hook. When stuffing the bodies, I added 5-7 pennies to their tushies to counterbalance their enormous heads.

This turtle was a little different:


You see the gold threads? I took some metallic gold embroidery thread and pulled out a single strand, then crocheted holding that together with the yarn. So this turtle has a little extra sparkle.

Edit: My friends have informed me that this turtle will now and forever be known as Edward. I am passing this information on to you, dear reader.

I can't believe it took me this long to finally get them all done! But now I'm done and so happy. Their adorableness is killing me.


 Thanks for reading, guys!

-Annie

Shared at:

NightOwlCrafting

Saturday, November 3, 2012

Commitment Day 3: Self-Taught, Self-Motivated


It's Day 3 of my 30 Days of Commitment series! See my other posts here.

When I talk about crocheting with my friends, they commonly ask me to teach them how to do it, or tell me it looks hard. My fellow crocheters, you know it's not all that hard, right?

I am a self-taught crocheter. I don't know how I stumbled upon it in the first place, but for years I have been in possession of a very old Crocheting for Beginners (not sure if that's quite the right title) book. I mean, this thing still had black and white printing. It was crazy.

My grandma taught me knitting when I was very young. I had a brief "knitting revival" in college (AKA a scarf that took me a year to finish), but it left me open to trying new things, and when that old book caught my eye, I decided to give crocheting a try.

It was hard at first. I had to squint at these old grayscale photos for long minutes, then squint and poke at my work, figuring out things as simple as how to count stitches and what on earth this whole turning chain business was.

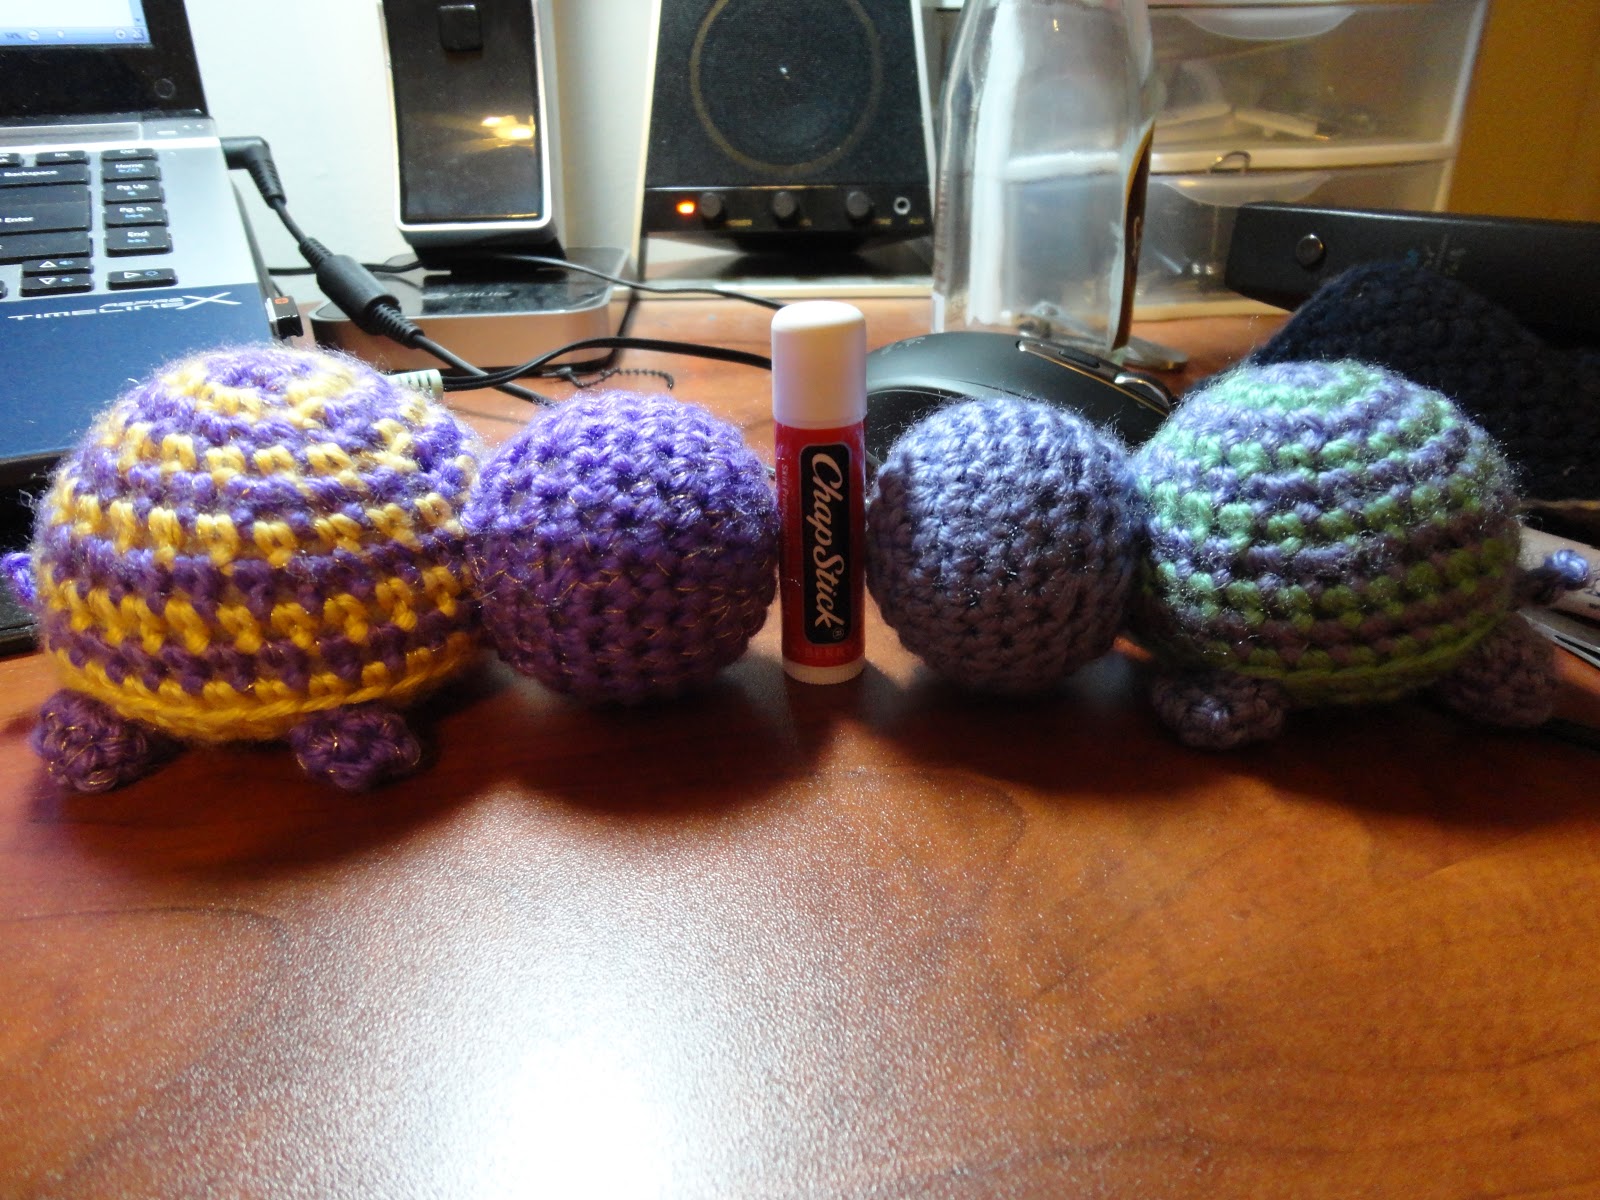
The worst experience was probably learning to crochet in the round and in a spiral, which I first tackled making the Tiny Striped Turtle. Remember these guys? I don't know about you guys, but it was an absolute nightmare figuring out how to count stitches in the round. But I did it, and check out my success!


That little yellow turtle was my first true crocheting success! Not long after, I went to study abroad in China, armed with a couple hooks. After finding some yarn, I tackled the 
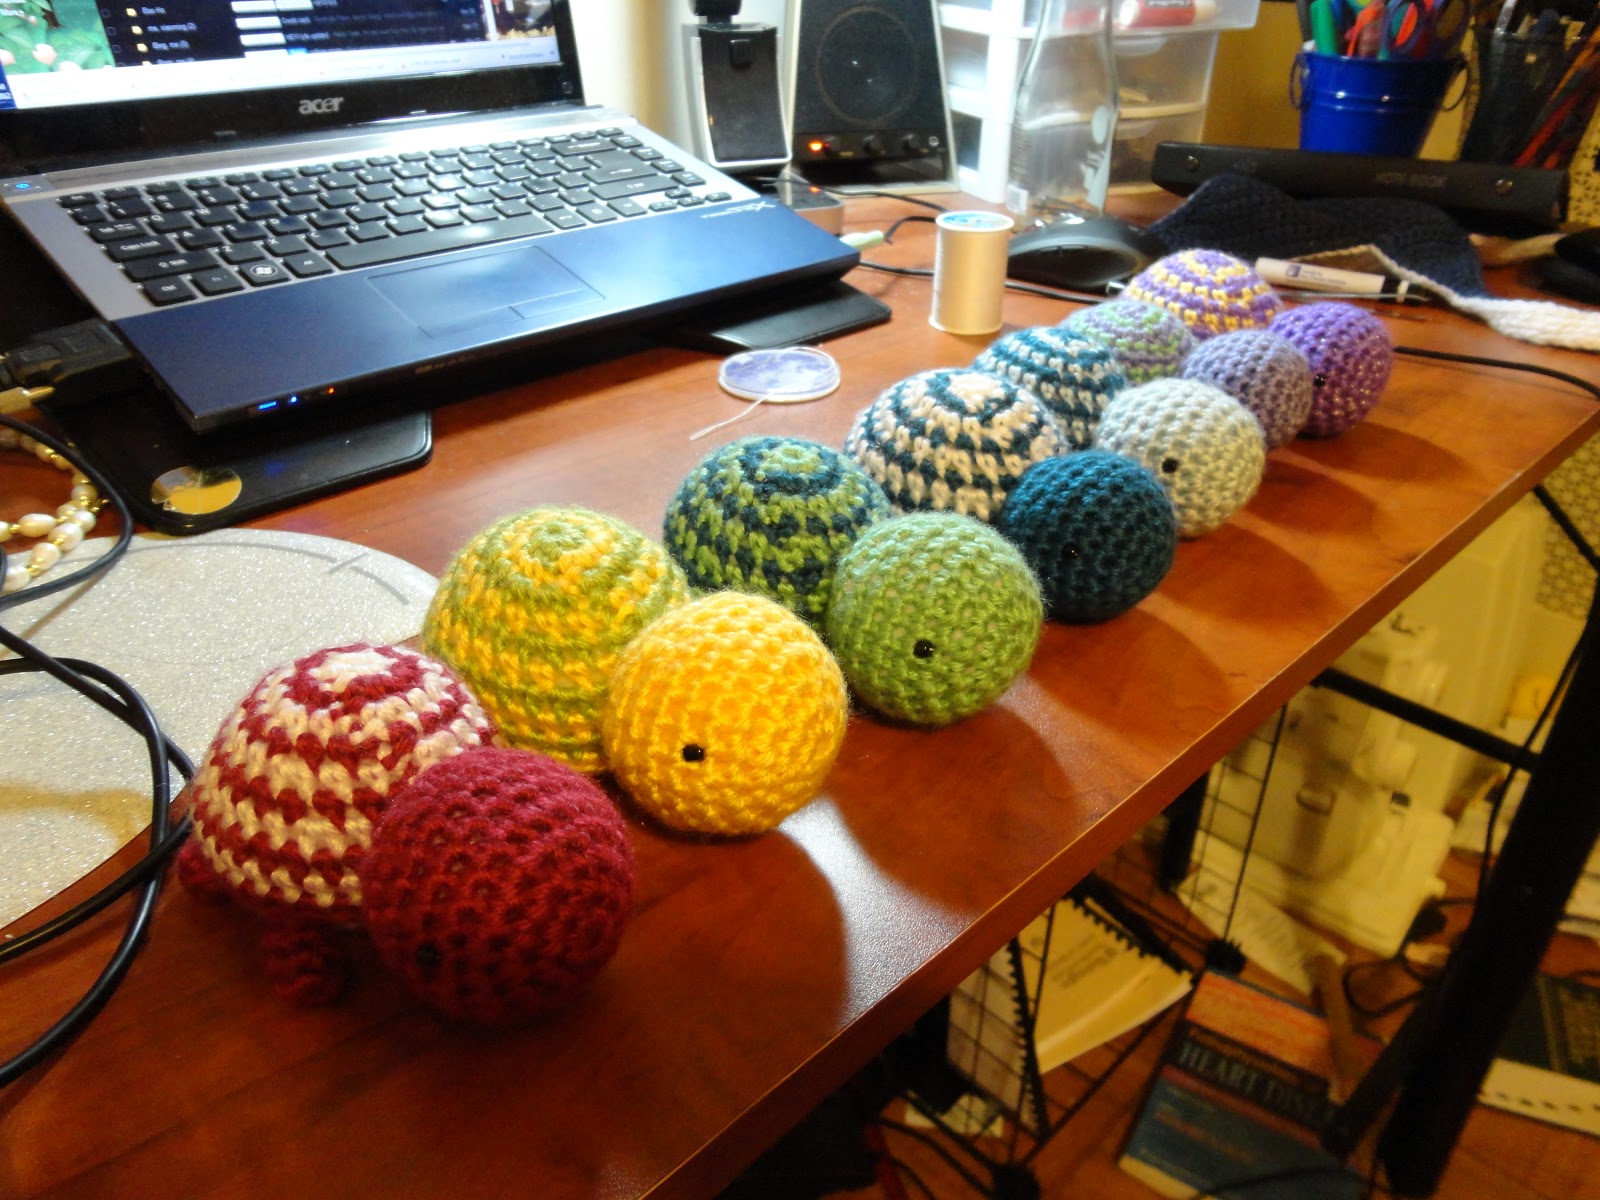
Swirls Cap pattern, which turned into yet another battle with round-counting, in which I finally mastered the art of keeping count of my stitches!


This is a very old project (like I said, one of my first). Maybe one day I'll do a post recapping my pre-blog projects.

The point of this is not just to tell you guys a boring story about myself. The point is to encourage all of you who read this to jump in and try new things. I would never have gained the confidence I have now if I hadn't picked up that book on a whim and given a new skill a shot. I would not be at this point if I had not picked patterns beyond my skill level and slowly battled my way through them.

If instead I had sat at my desk, admiring the work of others and not trying to surpass myself, I probably wouldn't be crocheting now. If you want to learn, learn! There are hundreds of great books out there to learn from, and probably thousands of instructional videos accessible with a few quick YouTube searches!

Sadly, given the limited time I've had in past years to really "pursue the craft", my skill level hasn't increased by much. However, I do have a few goals set for myself to accomplish in the coming years.

1. Make more amigurumi besides cute little turtles
2. Learn to design amigurumi
3. Crochet clothing
4. Give knitting another try
5. Learn to knit cables
6. Sew my own clothing

What do I have to spur me on? I have this giant collection of patterns and inspirations for amigurumi:

This is just for amigurumi...you don't want to see the massive collections of knitting and crocheting patterns and crafting  and sewing tutorials that I've amassed over the years.

I also have these books as motivation. On the left is a great collection of crochet stitches that I picked up at a used book store. In the middle is a present from a friend, a collection of gorgeous sweater patterns (all knitting patterns, all utilizing cables). On the right is an awesome book of sweater patterns. You can mix and match body, sleeve, neckline, and pocket styles. It's so freaking cool.


And, by browsing crafting sites and online stores like Modcloth and Anthropologie, I have accumulated hundreds of inspirations of clothes, accessories, and crafts I want to make.

It seems like a lot. What use do I have for all of these future ideas, with the finite time I have? How can I expect to master all these skills?

I mean, maybe I won't. I certainly won't recreate every single interesting dress or jacket that I saw on Modcloth. But the point is that I have collected all these things to motivate myself. When I look at my "hoard" of resources and inspiration, I see a goal I want to reach. I want to be that good. I want to be that skilled. I want to be able to devote that kind of time to hobbies I love.

So, inexperienced crafter that I am, this is the advice I offer:

- If you want to do it, do it, don't just sigh about how you aren't good enough.
- Challenge yourself. That's how you learn the fastest.
- Be brave enough to set unrealistic goals and acknowledge them as such.
- Collect your inspirations, and encourage yourself to keep moving forward

Now I want to hear from you! Share in the comments how you learned to sew/knit/crochet/whatever it is that you do! What is your advice to budding crafters?

-Annie

Wednesday, January 4, 2012

The New Year begins!

Hello everyone! As always, it's been a long time since I've posted, and yet again this will be more or less a quick in and out to update you guys and say hi. I hope everyone had a wonderful holiday!

My first order of business is to give you guys a huge thank you! The video I posted on the stitch used in my Forever 21 scarf has over 7000 views, and I have more than 70 people subscribed to my channel after just 1 video! I know that's small potatoes in the YouTube world, but it makes me feel warm inside that people are interested by what I do. Stay tuned, YouTube viewers, as another video is (eventually) forthcoming, although this one is oriented toward fashion rather than crafting. I hope you all will like it!

Also, I wanted to submit some proof to you all that I have actually been crafting during my long silences. So here are a couple of the things that have been occupying my time.


Pictured above, a shirtdress I picked up at the thrift store. It was much longer before and made me look absolutely ridiculous, so I had to hack off several inches, and now it's stylin'! Action shots will come in the future.


At the top is my new tote bag, made using this tutorial. The gray is a suede fabric, and the print is blue and gray with black characters, cranes, and other very Oriental-looking designs.

Below it is a black infinity scarf made using a lacy pattern from the book The Harmony Guide to Crochet Stitches, called the Open Crescent stitch. It's a great book I picked up for just a few bucks from a resale shop. I used Caron Simply Soft Black yarn and a G hook.

The gray is a scarf I made for my boyfriend using the free Lion Brand Thermal Scarf pattern. It's super stretchy and warm, and I might end up making my own in a more colorful yarn. I used Caron Simply Soft Heather Gray and a J hook.

The two turtles I have there are the first of 7 turtles made as presents for some of the friends I've made here at med school. Clearly not as much crocheting got done over break as there should have been. >_>

The black hat is a (possibly) work in progress. I wanted to imitate the hat I wore in the photo below, but I can't figure out knit cables to save my life.


I used another pattern from the crochet stitches book to try to imitate cables, but it doesn't involve post stitches, but puff stitches instead. I say possibly a work in progress because my original intention was to add a brim, but I'm not sure if it's necessary. Also, the ribbing (which was added on using this tutorial) is just a tad tight, enough so that every time I put it on I need to fuss with my hair in order for it to look right. Still, I'd say it's already a pretty rocking success.


It was also made with Caron Simply Soft Black yarn and an H hook.


This white hat was made using the famous Pretty Puffs slouchy hat pattern. I learned a lot from this hat. I was not using the same weight of yarn as she did or the same hook size, so I couldn't be sure that following her pattern exactly would get me the results I wanted. I was using DK weight yarn (sorry, don't remember the brand) and (I believe) a J hook. I ended up only needing to add an extra row of increases to get the hat to fit right, but it took me three tries and lots and lots of frogging to figure that out.

So that's what I've been up to! For 2012, I have so many projects I want to tackle, and I'm really really excited for the new year! Did you guys make any New Year's resolutions? Do you also have a massive list of crafty things to accomplish?

Thanks for sticking around! I will see you next time!

-Annie

Tuesday, June 28, 2011

Origami Roses

Greetings all! I'm back with a quick project I worked on about a week ago.

That is, it was supposed to be a quick project...

Do you remember this photo, from my turtle history?


I made these roses from construction paper for Mother's Day two years ago, using this tutorial. By now, sitting by that window has faded them to this:


Crazy!

So my mom asked me if I could redo them in something that will keep its color. My first thought was origami paper. Her first thought?


This is the same shiny stuff they wrap around poinsettia pots in the holiday season. It's pretty to be sure, but I'm warning you now, it's a bear to work with.

A paper rose might take me ten minutes. Might. Lots of pre-creasing.


However, these beautiful foil roses?


Each one took over an hour.

The problem with these is they don't stay when folded. They crease easily, but it won't stay put! I had paper clips hanging all over the place during the shaping steps, until I could lock the darn things in place.

But really....


SO worth it. They're gorgeous.

Now the white rose, of course, hadn't faded, only the pink and yellow had. But my mom was thinking, "Well, won't that one matte rose look odd against all that shiny-ness?"

She looks at me and says, "Why don't you try aluminum foil?"

I surprised to find out that the aluminum foil rose was significantly easier. The folds actually stayed in place (better than paper, actually); the only problem is that in both aluminum foil and the foil paper I had, it's difficult to reverse a fold (you know, make it fold the other way)...the foil doesn't like change, I guess.

But again...


TOTALLY WORTH IT.

Aren't these just beautiful? I am seriously considering screwing all gender stereotypes and making a bouquet of these for my boyfriend next Valentine's Day. Just so I can do it.


SO PRETTY. I'm a little obsessed.

Again, if you'd like to make these, the tutorial can be found here. Once you get the hang of it, it's quite easy. After two roses I could do it from memory. Please show me pictures if you try it!

Edit: Okay, so, um, ridiculous story. How many of you are familiar with the blog Inside Out Style? It's this really fabulous style blog by Australian image consultant Imogen Lamport. She has all these great posts that always focus on finding what is best for you. You'll see in my list of blogs I follow that I do read a few fashion blogs (it's one of my new interests), but I just don't talk about it much. But I have to say, Inside Out Style is one of my favorites because it's so practical and applicable to me.

So why did I mention this in the first place? Well, Imogen has a feature called Weekend Reading, and guess what link popped up there?

OMG YES. THE LINK TO THIS VERY POST.

Sorry, I'm just blown away that someone so "high and mighty" in the blogging world would have even noticed something written by me. It's exciting, and such an honor! :) Thank you, Imogen! Please visit her blog and/or take a look at the other bloggers in this week's Weekend Reading!

-Annie

Shared at:


NightOwlCrafting