Tuesday, November 27, 2012
Day 27: Calling it
This is Day 27 of my 30 Days of Commitment (see the other days here), and, sadly, it will be the last.
You may have noticed that there was a laaaaarge gap between this and my last post, and that was (mostly) intentional.
The original purpose of this series was for me to try just committing to something, as part of my experiment in learning how to be an adult. While it didn't quite work out, I've still learned from this experience. In the end, I have things that I prioritize more highly. Sadly, some things that aren't even a high priority for me (like window-shopping the internet for crafting inspiration, as I mentioned in this post) I end up doing before more important things anyways, due to a variety of reasons ranging from laziness to the conviction that "I'll have more time later."
I'm glad I decided to do this series, because it's helped me start figuring out how to make time for the things that really matter. Over Thanksgiving break, I spent hours playing video games and computer games with my brother and shopping with my mother. I could have spent that time blogging, or crafting, or even studying, but in the end, spending time with my family for the first time in three and a half months mattered much, much more.
So, sadly, I won't be able to see this series through. But ultimately, it did serve its purpose. Thanks to those of you who followed me on this short journey.
However, while I won't be posting daily anymore, I will try to make sure to update more frequently. Three months hiatuses are a bit long, don't you think? Let's see if I can at least check in with y'all every week or so.
With that, I have a mountain of studying to get back to! Catch you later!
-Annie
Saturday, November 17, 2012
Commitment Day 17: TV Shows I Love
A tangential note: A comment on my Youtube video for the Forever 21 Knock-Off Scarf brought an interesting point to my attention. The pattern I provide is much more a stitch pattern than it is an actual scarf pattern, at least in my eyes, yet I never named the pattern. I am proposing that we name this stitch the Crossed Clusters Stitch. What do you guys think? Do you have any suggestions for a better name?
Welcome to Day 17 of 30 Days of Commitment!
Today, some classmates and I are getting together to watch a few episodes of one of my favorite shows, Doctor Who. What better day to talk about some of my absolute favorite TV shows?
Read on if you'd like to see! :)
Friday, November 16, 2012
Commitment Day 16: Basketweave
This is Day 16 of my 30 Days of Commitment series. Check out the other posts in this series, too!
Gosh, I'm sorry, guys. This has been another hectic week for me, and I ended up letting this series slide yet again! But then again, this is sort of what the purpose of this whole series was right?
Well, I just go on thinking like that so I don't feel as guilty. ^_~
What I'm sharing with you today is a pretty old project that I never got around to posting. This bag:
A long time ago, I was flipping through a crocheting magazine and was intrigued by a photo of a cross-body purse made using the basketweave stitch. I found this stitch in my book of many crochet stitches, but it's easy to find. A quick Google search brought me to this tutorial, which looks pretty much like what I did.
This was a pretty easy bag to make. I crocheted two panels of basketweave for the front and back, then crocheted one long strip of single crochet to make the strap. I simply single crocheted along the edges to connect them.
A little too late, I discovered an interesting flaw in this design: a crocheted strap will streeeeetch. And mine was already bordering on too long. So after some pondering, I happened upon this solution. Use ribbon!
Basically, I found some ribbon in a coordinating color to stabilize it. The ribbon I found wasn't nearly wide enough, so that line you see going down the middle is where I zigzag-stitched two ribbons together. Once this was done, I simply lined up this ribbon strip along the crocheted strap and sewed down each edge. Voila, problem solved!
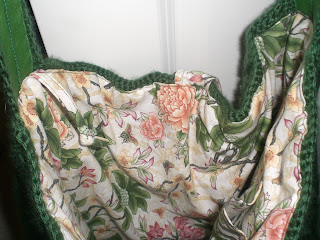
I chose this gorgeous fabric for the lining. The method for making it was similar: cut out two large rectangles for the front and back and then a long, continuous strip for the sides and bottom.
I did, however, add a couple things to the lining. I added three pockets, two cell phone sized and one larger.
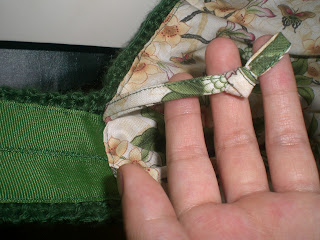
I also added a key fob, because I hate having to fish through a big bag for my keys.
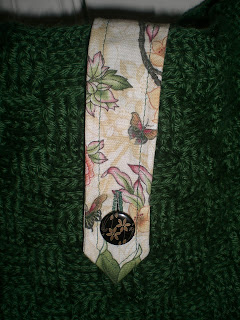
There's also a closure strap that can button at two different buttons, depending on how full the bag is.
And to attach alllll of this to the crocheted portion, I slid in the lining, sandwiched the button strap and the key fob between the two layers, and sewed it all together.
Instead of doing the usual thing with lined bags where you flip everything inside out, etc, etc, I simply folded down the edges of the lining and basically topstitched around the edge. Worked out pretty well. :)
So what do you think? I'm pretty proud of this bag. It makes a nice, casual alternative to those days when I'm just not feeling the backpack (my laptop fits in there nicely).
I hope you enjoyed this post, and I hope you found it inspiring! I enjoy those times when I see something and am able to recreate it myself without relying on patterns. :)

Tuesday, November 13, 2012
Commitment Day 13: Storage Solutions - Earrings, Rings, and Watches
Welcome to Day 13 of my 30 Days of Commitment Series! You can find the other posts in this series here.
This isn't quite what I had planned for today; I just found out that I don't have the photos that I thought I did, so that will have to wait. Instead, I'm continuing my series on how I store my oodles and oodles of stuff.
The champion of today's post is boxes. Boxes of any kind. Pretty ones saved from gifted jewelry, or candy, or laying around storing silly things like decorative silverware. Put those boxes to use!
As a recap, here is the "accessories corner" of my room.
When I was China, I saw these wire-framed, straw-wrapped, jewelry-holding doohickeys that I instantly knew I needed. To hang it, I tied a piece of embroidery floss around the wire at either side of the top "petal", then hung the whole thing over yet another Command hook. Don't be fooled, that thing is heavy with so much hanging from it.
But in the end, it really is oh-so-perfect for "hook" earrings.
It's roughly organized between metallics and non-metallics, as well as "big and dangly" vs. "small and delicate". This really helps me when I have an idea of what kind of earrings I want to pair with an outfit and don't feel like searching across this whole spread (it's surprisingly difficult to actually find the pair you want, even in such a small area).
My post earrings all live on the cart in two boxes. This one below holds the "fun" ones, ones that I am more likely to wear in a casual setting. The box itself used to hold one of my silver bracelets that is now hanging on the wall with its brethren.
See the snake one hanging from the lid of the box? That's an ear cuff, and I will definitely be wearing it when the opportunity comes. Super-cool.
Also note how, as much as possible, I try to keep my earrings paired by fastening one of them through the stopper of the other one.
The fancier post earrings I keep in this flower box. Remember the M&Ms teddy bear box from this post? This one also once held M&Ms.
Going clockwise from the bottom:
- The first compartment holds green-toned earrings. For some reason I have a lot of those.
- The second compartment holds my earrings that are primarily gold.
- The next two compartments hold vintage earrings that used to belong to my mom. They wreak havoc on my ears (I have a relatively sensitive nickel allergy) so these are reserved for special, short-term wears.
- The fifth compartment (it's kind of difficult to see) holds the dangly crystal-and-silver earrings.
- The sixth compartment holds my crystal and pearl studs.
- The center holds any hoop-style earrings. Most of them are actually a perfect fit!
I rearrange these on a regular basis, as my collection changes frequently. Some time soon I will need to go through my earrings and put away the ones I don't usually wear.
Moving on to rings!
This box used to be just a box, and I would throw my rings in it willy-nilly. I finally decided I had enough and actually turned it into a real "ring box."
 |
| See the ribbon-like one on the bottom left? My favorite ring, hands-down. |
It was a very easy and fast project. With some white fleece, I cut out a rectangle about as wide as the box and at a length that I knew was too long. I rolled it up until the roll was the size I wanted and cut off the excess, then used that rectangle as a pattern for more pieces to cut and roll up. I just kept cutting out and rolling rectangles until the box was filled. Then, it was a simple matter of sliding my rings in, sorted, of course, by the base metal.
I used another box for my watches. Someday I may devise some dividers or something to keep them better sorted, but for now, this works fine. I have a bunch of other watches that either don't suit my taste (again, passed down from my mom), are broken, or have no battery in another box hidden away in the drawer.
Hope you enjoyed this installment of my Storage Solutions! Eventually you'll get to see what I do to store my other accessories, clothes, and crafting stuff. Hope you're looking forward to it as much as I am!
-Annie
Shared at:Monday, November 12, 2012
Commitment Day 12: Giving in
This is Day 12 of my 30 Days of Commitment series! See other posts here.
Seriously, you guys, my bad. Four days of posts, all missed! I'll do better for the rest of the month, promise. :)
Exam week ended with a rush of activity, as I packed up for the weekend to attend a medical conference. Now, a new block is starting, a big "cultural performance" of sorts is coming up at the end of the week, and my room is a jungle that needs to be tamed.
So I will continue to treat this posting series as an exercise in time management, and I am taking the following lesson from the past four days of non-posting:
There are just some days when you need to give in and let go of something. For me this past weekend, that was blogging.
Stay tuned...I'll be back tomorrow with something really nice!
-Annie
Wednesday, November 7, 2012
Commitment Day 7: Books I Love
Read the rest of my 30 Days of Commitment series here.
Hi guys. It's Day 7 of my series, and I have a terrible secret to share with you: I love reading.
Okay, so that's not terrible at all. Nor is it really a secret.
I've loved to read for as long as I am able to remember. Fun anecdote: my mother tells me that when I was three, she first found out that I was reading from my daycare teachers! I think they were worried about me sitting in a corner by myself, reading and not playing with the other kids? I'm not sure.
Anyways, I devoured books when I was a kid. I was very quiet and shy and probably kind of weird and oblivious, too (still am), so instead of horsing around with the other kids, I read books. It quickly became apparent that while I enjoyed reading of any kind (did anyone else grow up with the Charlie Brown 'Cyclopedia series???), my true love was fantasy. Wizards, fairy-tale kingdoms, strange creatures, magic...it all drew me in like a bee to honey.
I think the truly wonderful thing about fantasy is the worlds that the authors create. Entire cultures, rules for the properties and usage of magic, new lifeforms; all of these came to life for me in fantasy books. I loved imagining these worlds, recreating them, wanting to experience life in these worlds. It was just mesmerizing.
Now here's my problem: I am also a re-reader. I think this really started with the Harry Potter series. JK Rowling has this great knack for weaving together a complex storyline that suddenly brings together so many disparate elements scattered throughout the story. Nothing pleased me more than to read her books over and over, suddenly understanding her hidden clues, the not-yet-revealed backstory. It was intense stuff.
The only problem with this is that re-reading tends to leave me in a safety zone. I don't frequently go out and read new books, especially since college and med school have kept me busy. It's easier to relive a story you already know you love than venture forth and try to find a new one you will also love.
The point to all of this is that a lot of my favorite books, even now, are more young adult books. If you guys have any recommendations for more adult-oriented books, please feel free to mention them in the comments!
And so we begin... (click below to read my ridiculously huge list)
Tuesday, November 6, 2012
Commitment Day 6: A Little Jewelry Inspiration
Day 6 is here! See the rest of my 30 Days of Commitment series here!
Today's exam was exhausting! But I pulled through, and with a nice long nap and a long cooking break, I'm ready to work again!
...after, of course, today's post. ^_~
Today's post comes thanks to a site where I take a lot of inspiration from. I have a huge collection of inspirations for clothes, etc. that comes from Modcloth.
Recently, I found this necklace, the Just Bead Yourself Necklace in Concord.
When I saw this, I remembered these:
A while back, I found a store that sold a bunch of these "pearl" necklaces for a dollar each. In colors like this, who could resist?
My initial thoughts were to make one of those bird's nest necklaces (like this one), but I wasn't sure what else I wanted to do. The Just Bead Yourself Necklace is a good inspiration point.
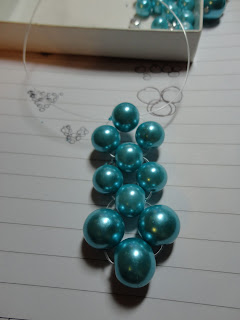
I didn't really have time to actually make it, but I did experiment a little during one of my breaks. Using the fiber that the beads came strung on, I tried stringing a few beads together to see how it might look.
Did you see in the product image how the beads steadily decrease in size? While the blue beads don't come in that many sizes, the gray beads I have come in smaller sizes, so I might incorporate those in to the design as well.
Here were a couple of idea sketches I made:
Do you guys have any suggestions? Have you made jewelry before?
Thanks for reading!
-Annie
Monday, November 5, 2012
Commitment Day 5: Storage Solutions - Bracelets and Necklaces
Day 5 is here (see the other Days here), and boy, did I cut it close today! Still immersed in exams (one down, three to go!), so today is again a short one.
Storage is a big problem for me. I have a lot of stuff and not tons of space, nor do I want to spend tons of money on fancy solutions.
I have accumulated a ton of jewelry. A lot of it is inherited from my mom, gifts, collected from garage sales, and bought off clearance. This stitcher may be stingy, but she's also a bit too enthusiastic about finding a good deal!
In several posts this month, I'll be showing off what I've done to store my jewelry so it's visible but out of the way. Today's all about the bracelets and necklaces. And today's star players are Command wall hooks, shower curtain rings, and paper clips!
This is an overview of my "accessories corner", sandwiched between the bookshelf and the closet door (on the right). You'll eventually see all of what's going on here in future posts.
Focusing on the left first, you see a ribbon with loops tied in it, hanging from two of those Command wall hooks.
And threaded through those loops are nothing less than shower curtain rings, holding my bracelets and bangles in sets and loosely related groups. All well-displayed and easily removed, and not even taking up table space!
I also have a few bracelets that are stiff and open (you know what I'm talking about, right?). For those, I just dangle them from the mouth of an old, cleaned-out jar. Easy-peasy, and I'm not afraid that they'll fall off and land who-knows-where.
Necklaces were interesting for me, as I have a lot of those. I have this straw-wrapped, wire jewelry frame I obtained from China years ago, and it has served me so well. In order to maximize its utility, I added hooks made from bent paperclips to hang necklaces from. I threaded those through the straw, making sure they hooked over the wire frame so they wouldn't rip out.
Longer/wider/busier-looking necklaces are relegated to these hooks on the side. Thanks again, Command!
And hiding away in a drawer is a little bear-shaped box (its former incarnation) holding other pendants and chains.
I hope you enjoyed looking at this! I enjoy being able to browse through other people's storage solutions to find approaches that work for me. Hopefully I inspired you!
Anyways, I have to get back to studying. Wish me luck, and I will see you tomorrow! Thanks for reading!
-Annie
Shared at:
Sunday, November 4, 2012
Commitment Day 4: Afghans
It's Day 4 of my 30 Days of Commitment series! See other posts in this series here.
Yikes, exams are this week! A lot of posts this week will be pic-heavy with hopefully less rambling than usual!
I was about a month into the "learning to crochet" process when I saw the concept of a chevron afghan in a magazine somewhere. The concept was easy (skip a stitch at the "valley", increase a stitch at the "peak"), so I boldly purchased a few skeins of Simply Soft Caron Eco and got to work!
Four years of extremely intermittent crocheting later...
 |
| Featuring a guest appearance by Cabbage the panda, Pancake the polar bear, and Blackjack the dapper black bear. |
Before y'all judge me too hard for taking this long, consider this. Lacking any real crocheting experience, I made a fatal miscalculation in the design of this afghan.
It's in single crochet. You guys. This thing is a beast. It's so dense and heavy. It takes forever to add to its length. It's eating up so much yarn. OMG.
See that? That's a page of notes I made when determining the size of this blanket. Its finished dimensions will be about 4.5 feet by 5 feet (currently it's about 70% done). And this thing is going to take 30 skeins of yarn.
*dies*
Someone with afghan-making experience, tell me: is this normal???
Anyways, in my infinite wisdom, I also decided to start a granny blanket last spring. Here's my progress so far, minus a few I have in my carrel at school. I work on those when I have time to kill there and I'm not in the mood to study.
I'm currently going with this configuration. My working plan for these requires almost 150 squares. Yahoo? It'll be about 5.5 feet wide and about 6.5 feet long.
I'm still not sure how I plan on joining these up. Experienced crocheters, do you have preferred joining methods?
Thanks for tuning in, guys, and wish me luck on my tests!
-Annie
Shared at:
Subscribe to:
Comments (Atom)


