Welcome to Day 2 of my 30 Days of Commitment! Find the other 30 Days of Commitment posts here.
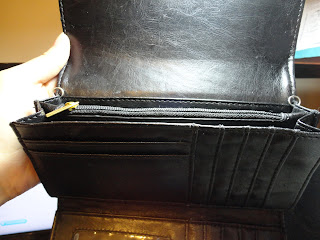
I obtained this wallet on an Alaskan cruise this past August with the intention to use it as a clutch, but with no strap of any sort, I just found it way too difficult to deal with.
Via craftgawker, I found this simple tutorial on how to add a chain on to make it into a little purse. Personally, I didn't like the idea of just hooking it to the zipper and looping the chain under the flap. Seemed sort of unstable.
So for those of you who are interested in learning another way to do this simple DIY, keep reading after the break!
What you will need:
- Your wallet
- A chain (mine was about 30 inches long)
- Jump rings
- Clasps (lobster clasps are easy)
- Jewelry pliers (optional)
- Pointy things (I used a safety pin)
Note: see the box above? I've collected lots of various "doodads" from old jewelry and keychains, although I did ultimately go out and buy a set of jump rings and clasps. Sometimes, just collecting these little oddments can take you pretty far.
Step 1: Open up your wallet and decide where your rings are going to go.
 |
| Step 1: The hole will be the same position on the opposite side |
 |
| Step 1: Another view |
Step 2: Poke a hole there! I started with a safety pin, then used my seam ripper and a big paper clip to widen the hole.
 |
| Step 2: Again, do the same for the other side |
Step 3: Open up your jump ring. It's easier with pliers, but before I obtained those, I used my fingers and it worked out fine (although you might want to make sure your nails are cut, unlike mine).
 |
| Step 3 |
Step 4: Thread the jump ring through the hole you poked and close it up tight!
 |
| Step 4: All closed up! |
 |
| Step 4: Do the same for both sides |
Step 5: Prepare your chain. Mine was originally a necklace chain, so it already had a clasp on one end and a jump ring on the other. If you have a chain on its own, you will need to add clasps to both ends of the chain. Add the clasp by opening up a jump ring and threading it through the last chain link and the loop on the clasp.
(Some chains will will have links large and thin enough that you can just open a chain link and thread the clasp on directly)
 |
| Step 5: Before My job's been half done for me! |
 |
| Step 5: After Clasps on BOTH ends of the chain |
Step 6: Hook your clasps on to the jump rings on your mini-purse.
 |
| Step 6 |
And you're done!
 |
| Again, please excuse the weird pictures |
And with this, you can easily convert it back into clutch/wallet form by unclasping your chain.
 |
| Nice and nondescript jump rings |
Now, while keeping the point where they cross outside of the purse, pass that top loop loop under the flap, leaving you with a shorter, doubled chain on the outside.
You have two options with this. Hold on to both strands for a shorter chain:
Or hold on to just one strand and let the other fall flat against the top of the purse for a slightly longer chain.
I hope this tutorial proves useful! I'll certain get a lot more out of this purse now that it has something easy I can toss over my shoulder. Enjoy!
See you tomorrow!
-Annie
Shared at:


No comments:
Post a Comment
Note: Only a member of this blog may post a comment.